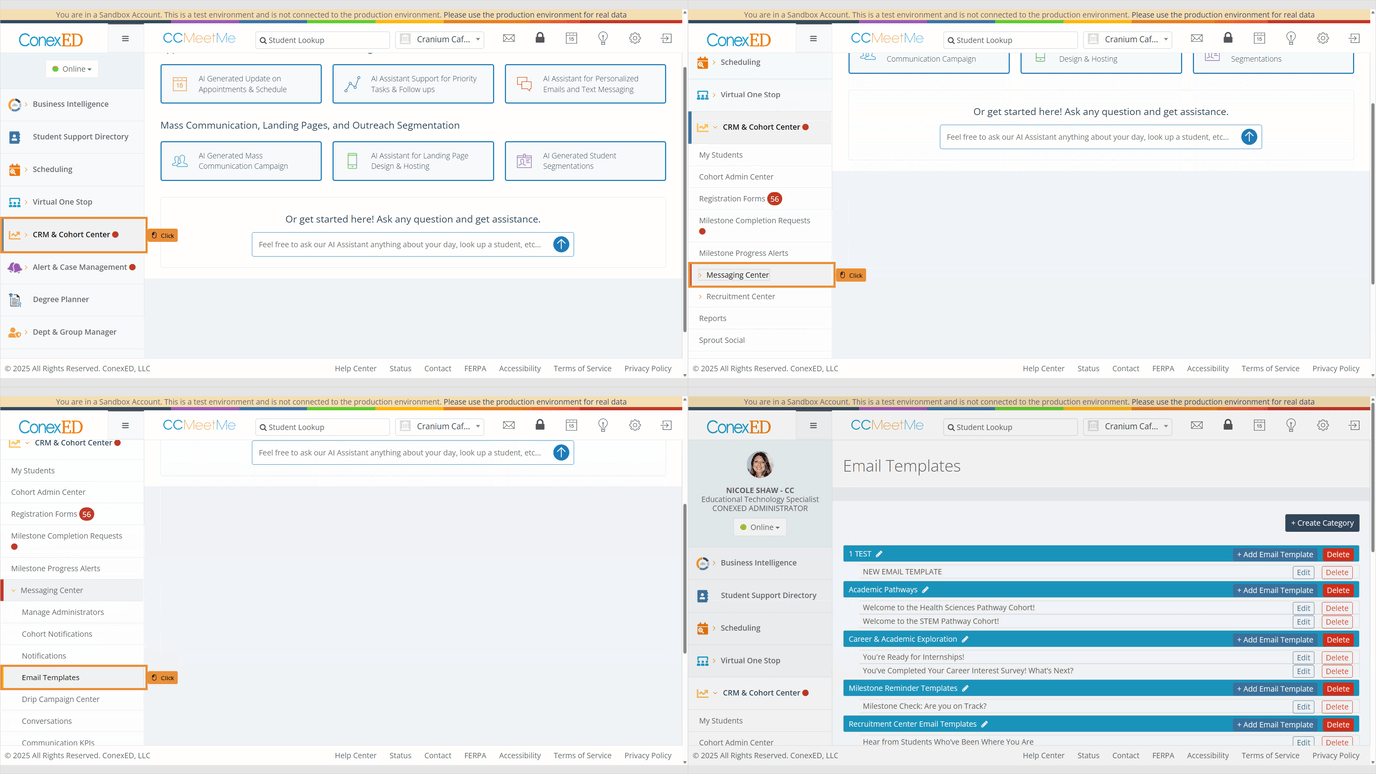
How to Create Email Templates in the CRM & Cohort Center
This article applies to the following role permissions: ConexED Administrator - Department Director - Group Manager - Faculty/Staff
Effective email communication is essential for engaging and supporting students throughout their educational journey. ConexED's Email Templates allow institutions to streamline messaging by using consistent, customized emails across Cohorts, Registration Forms, and Drip Campaigns. Centralizing email management in this way improves both accessibility and administrative efficiency.
Accessing the Email Template Builder
To access the Email Template Builder in ConexED:
- Navigate to the CRM & Cohort Center from the main navigation menu.
- Select Messaging Center.
- Click on Email Templates.

Creating a New Email Template
Here, you can manage your email categories, existing email templates or create new ones.
- Click the Add Email Template button to begin.

- On the “Create Email Template” page, enter:
- Email Subject: This will appear in the recipient's inbox.
- Email Body: Use the rich text editor to craft your message. Below is a breakdown of the customization options available for building and formatting email templates:
- File, Edit, Insert, Format, Tools, Table – Standard formatting tools for composing and organizing text and layout.
- Short codes: Use short codes to customize your email template for the recipient. You can choose to include the recipient's Name, Email, or Phone number to make the message more personalized and relevant to the individual.
- Forms: Include a link to an existing Registration Form, allowing students convenient access directly from their inbox.
- Meetings: Offer students your scheduling link to streamline the scheduling process and provide easy access for students.
- Milestones: Include links to specific milestones that students need to complete. Directly linking to these Milestones simplifies the navigation process for students and encourages timely completion.
Users can easily apply different formatting styles, adjust fonts, align text, incorporate colors, and more to enhance the visual appeal of their documents or presentations. These tools offer flexibility and creativity in design, empowering users to tailor their content to specific preferences or branding requirements effortlessly.

Please Note: If your laptop is in Tablet Mode, the resizing lines used to expand the modal window may not be visible. To adjust the modal size, ensure Tablet Mode is turned off so that the resizing handles are accessible.
Although our email templates are user-friendly and do not necessitate any HTML coding knowledge, you have the flexibility to edit the Source Code of your email template for a truly customized experience:

Email Header Banner Image
Upload an optional image to display at the top of your email (e.g., school logo or banner).
This can help brand your communications and provide a professional look.

Create Template Button
Once all required fields are completed and formatting is finalized, click “Create Template” in the bottom-right corner to save your work and make the template available across:
- Drip Campaigns
- Registration Forms
- Cohort communications