-1.png?width=360&height=66&name=Untitled%20design%20(4)-1.png)
This article applies to the following role permissions: ConexED Administrator
This guide provides step-by-step instructions to configure the SAML2 login settings. These steps are designed to be self-service, allowing ConexED Admins to easily configure SAML2 authentication for their institution's users.
Step 1: Accessing the Admin Panel
- Log into your ConexED Admin account
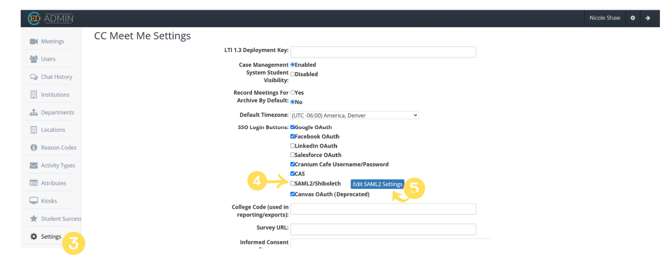
- Click the gear icon in the top-right corner to access the Admin Panel

- In the left-hand side menu, navigate to the Settings tab
- Under SSO Login Buttons, check the box next to SAML2/Shibboleth to enable SAML2 authentication
- Click Edit SAML2 Settings
Step 2: Configuring SAML2 Settings
In the popup, you’ll find two main sections: SAML2 Settings and Federated Attributes.
- IdP Metadata URI: Enter the URI provided by your Identity Provider (IdP) and click Load to automatically populate the fields
- IdP Entity ID: Enter the Entity ID from your IdP
- Log On URL: Input the URL where users will authenticate
- Log Out URL: Enter the URL where users will be directed upon logging out
- Certificate: Upload the certificate issued by your IdP for secure authentication
- Login Attribute: This is typically the user's email address and is mapped to their ConexED username. Special characters will be removed
- Strip Domain from Login Attribute: Check this box if you want to remove the domain (e.g., @example.com) from the username

Step 3: Mapping Federated Attributes
This section allows you to map attributes sent by the IdP to corresponding fields in ConexED:
- partner_username: Maps to eduPersonPrincipalName (primary user identifier)
- email: Maps to the user's email address (mail attribute)
- fullname: Maps to displayName (user’s full name)
- role_name: Maps to eduPersonAffiliation (assigns user roles like Faculty, Staff, or Student)
- You can define role mappings using the role_name RegEx field
- sis_user_id: Maps to a custom Student Information System (SIS) ID or a unique student ID
- timezone: Maps to the user's timezone
- institution_code: Assigns the default institution for users (useful for districts with multiple institutions)

Step 4: Testing and Saving the Configuration
- Click Test Login to verify the SAML2 settings are correctly configured
- After confirming the settings work as expected, click the blue Save button at the bottom of the popup to save your configuration

By following these steps, ConexED Admins can easily configure SAML2 authentication for their institution, streamlining user access and ensuring secure login.