To add a student to the Live Queue, follow these steps:
1. Navigate to the Check-in Kiosk tab of your Group
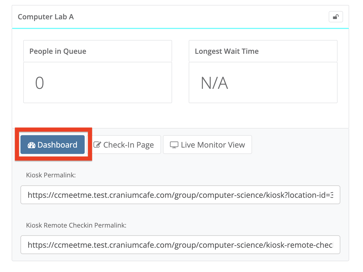
2. Click on the "Dashboard" button for the specific Kiosk location where you want to add the student:
3. On the Check-in Kiosk Dashboard, click on the button labeled "Add Student to Queue":

4. After clicking the "Add Student to Queue" button, you will be able to input the necessary information for the student's meeting:

Select a Student: Begin typing the name of the student you would like to add and select the student from the populated options. If the student does not currently exist in our system, you can use the "Create New Student" button to successfully add the student to the Live Queue
Select a Counselor: Select a specific Faculty/Staff member for the student to meet with, or choose "Next Available" to assign this student to the next available advisor
Select a Reason for Meeting: Select a Reason Code associated with the meeting
Note: Only Reason Codes that have the "Show in Kiosk" option enabled will appear
Check-In Notes: Add any additional notes or details regarding the student and/or meeting
5. Click "Add" to add the Student to the Live Queue