-1.png?width=360&height=66&name=Untitled%20design%20(4)-1.png)
This article applies to the following role permissions: ConexED Administrator - Institutional Administrator - Director - Group Manager - Faculty/Staff -Front Desk Agent - Student Worker
There are many options to customize your calendar view to make it work best for you. If you are in multiple groups, you may need to have different views for different reasons and our system allows you to customize your own view to meet those needs.
Navigate to Scheduling - settings - and select a group to modify the calendar view, or, navigate to Settings & Documents - Office Hours & Settings - to access your personal calendar.
Find the settings Gear Icon on the top right corner of the calendar and click to open the Calendar Settings.
General Calendar Settings
By default, the Calendar Settings popup will open to the "General" settings tab. From here, you have the option to customize how your calendar looks and functions according to your preferences:
-png.png?width=661&height=498&name=General%20Calendar%20Settings%20(updated)-png.png)
-
Start time: The initial time that is shown on your Calendar. Default is 6:00AM.
-
End Time: The final time that is shown on your Calendar. Default is 12:00AM.
-
Time Slots: The time increments displayed on your Calendar. Default is 30 minutes.
-
Time Slot Snap: The amount of time that shows as a default when creating office hours or Busy event from your calendar. Users frequently set this snap to 30. Default is 5 minutes.
-
Default Calendar View: Choose Calendar display view for personal default. Options include Day, Glance, Week, or Check-in Details. Default is Week.
-
Include Weekends: When enabled, weekends will be included in your Calendar .
-
Use Horizontal Day View: When enabled, changes the view of your Calendar from vertical to horizontal. The time displays at the top of the Calendar and Groups/Group Members display on the left hand side.
-
Hide No Show Appointments: When enabled, appointments that have been marked as "No-Show" will not be displayed on the Calendar.
- Event Colors: Customize the colors of your calendar events
- Show Reason Codes: Shows reason codes on calendar. Best Practice is to keep Show Reason Codes enabled. Default is Show Reason Codes enabled.
Any changes made to your settings will save automatically, so you can close out of the popup window once you have made your selections. There is not a SAVE button. Do not hit choose Reset Settings - as this will reset the selections you just made and restore defaults.
Groups and Users
On the Groups & Users Calendar Settings tab, you can customize how Groups and Group Members appear on the Calendar:
-png.png?width=640&height=498&name=Groups%20and%20Users%20tab%20Calendar%20Settings%20(Updated)-png.png)
-
Sorting: When this option is selected, users will be sorted alphabetically by name rather than the Group's default order
Please note: The default order of other Faculty/Staff is determined by the Group Manager in the group settings, and can only be changed by Group Admins or higher.
-
Visible Groups: Select the Group(s) you would like shown on the Calendar
Please note: This will only appear if you have been added to multiple groups
-
Visible Users: Select the specific Users you would like shown on the Calendar
-
Hide Users Without Office Hours: When enabled, users who do not have Office Hours configured will not be displayed on the Calendar.
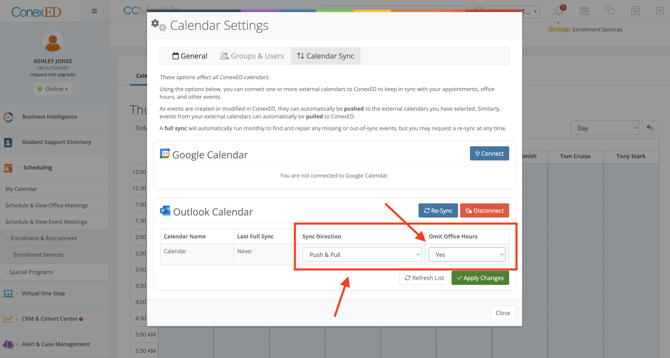
Calendar Sync
The Calendar Sync tab, permits you to sync your calendar. Syncing your Outlook or Google Calendar will ensures your availability stays updated.
Select Connect for the type of calendar you wish to sync and follow the prompts to login to that calendar if needed.
Sync Direction: Select PUSH & PULL
Please note: Privacy is maintained when you sync. You will see the titles for your synced events, but others will only see the words "Synced Event".
Omit Office Hours: Select Yes
Please note: Often this selection of Yes can confuse people. The office hours you create in ConexED indicate your window of availability for potential scheduled appointments. The reason you want to omit the office hours you created from the sync, is to ensure that only those appointments that are actually scheduled are synced, not that entire window of availability.